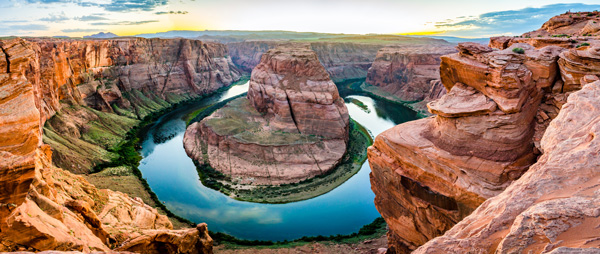
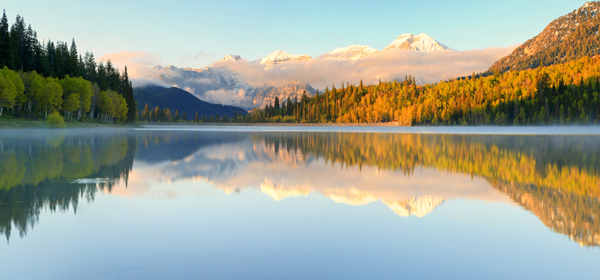
Do you want to take your landscape photography to the next level? A panoramic photo, made from multiple shots merged together, can be far more impressive than a single photo taken with a wide-angle lens. You’ll get far less lens distortion, and the resulting photo size means you can get much larger prints from your panoramic photos. In this tutorial, you’ll discover how to shoot panoramic photos and how to merge these photos together to create the final panoramic image in Lightroom Classic CC or Lightroom 6.
What Is A Panoramic Photo?
Panoramic photos are created by taking a series of overlapping photos of the scene and merging them together digitally using special software.
But wait! Why not just take a single photo of the scene with a wide-angle lens?
That’s a good question. There are many good reasons why you should shoot panoramic photos using multiple photos rather than a single wide-angle photo.
- Your wide-angle lens may not be wide enough to capture the whole scene in a single shot
- Photos taken with a wide-angle lens exhibit undesirable lens distortion
- A panoramic image created from multiple photos is much larger than a single shot, and therefore can be printed at much larger sizes
- A standard lens can be used instead of an expensive, specialist lens
What Lens Should You Use?
Every lens has a “field of view,” which is how much of the scene gets captured, measured in degrees. A wide field of view (e.g. 100 degrees) scoops up much more of the scene than a smaller field of view (e.g. 50 degrees).
A wide-angle lens is a popular choice for landscape photography, and these typically have a very wide field of view. While a wide-angle lens works well for capturing a landscape in a single shot, the amount of lens distortion produced means it’s not the first choice for panoramic photography.
A long telephoto lens will have a much smaller field of view. Unless you’re trying to make a panoramic photo from a distant portion of what you can see, this isn’t the best type of lens to create panoramic photos with.
A standard lens (one that is neither too wide nor too long) is perfect for when you shoot panoramic photos, as there’s minimal lens distortion, resulting in more realistic panoramic photos. Choose a lens (or focal length on your zoom lens) of between 35mm and 80mm, depending on how close your subject is.
How To Shoot Panoramic Photos
It’s easy to shoot panoramic photos, but there are certain things you can do to guarantee excellent results.
1. Use A Tripod
While it’s not essential to use a tripod, you will get better results because the photos you capture will be in alignment in at least one axis. When the photo merging software merges your photos later, there will be less wastage and you’ll end up with a slightly larger panoramic image.
2. Shoot RAW
For best results, it’s advisable (but not essential) to shoot in RAW rather than JPEG format.
RAW images are the digital equivalent of negatives in film camera terms. Unlike the JPEG format, there’s no image compression, and no adjustments to the image are made (such as sharpening or changes to color saturation, etc.).
RAW gives you far more options for working with the images in post editing. Furthermore, Lightroom Classic CC & Lightroom 6 are just as happy merging RAW images into a panoramic photo as it is with JPEGs. In fact, if you use RAW images, the resulting panoramic image will itself be a RAW image.
3. Take A Test Shot In Aperture Priority Mode
You’re going to use Manual Mode to capture the photos which will make up your panoramic image. But first, to help you identify the correct exposure settings, switch to Aperture Priority mode, set the aperture to f/11, then take a test shot of the brightest part of the scene.
Check that the test shot has enough sharpness in the foreground and the background. If it doesn’t, then increase your aperture value, e.g. to f/16, and take another test shot.
Double-check that there are no blown highlights in your test image. That is to say, very bright white areas. Many cameras indicate blown highlights by making them flash on the camera’s screen.
If you do find blown highlights, you have two options.
i) Make a note to increase the shutter speed by one stop, e.g. if the shutter speed is 1/250s, change it to 1/500s, in step 4 below.
ii) Adjust your camera’s exposure compensation setting to -1. If that works, remember to keep that exposure compensation setting for step 4 below.
Both of the above options will halve the amount of light that reaches your camera’s sensor, reducing the effect of blown highlights.
Once you’re happy with the test shot, make a note of the aperture, shutter speed, ISO, and exposure compensation settings. You’ll need them in the next step.
4. Select Manual Mode
For the very best results, you’ll need the exposure to be the same for each of the photos you take. The aperture size, shutter speed, and ISO should be constant for each of the shots you take. You’ll use the values you identified in your test shot.
To ensure the values don’t change between shots, switch to Manual mode and set your aperture, shutter speed and ISO values based on the values you identified in your test shot.
The reason for using the exact same settings for each shot is to ensure that the image brightness remains constant for every shot you take, creating a seamless final panorama.
5. Set Your Focal Distance
Your focal distance is the distance from the camera sensor to the point in the scene you want to focus on. It’s important that you keep the focal distance the same for each of the photos you take. This is because shooting each photo at different focal lengths will cause variation in the sharpness of elements of the scene which are at the same distance.
A rough guide is to focus one-third of the distance from where you’re standing to where the furthest element of the scene is, e.g. the horizon.
To ensure the focal distance doesn’t change between shots, once you’ve found the right focal distance with your lens, switch to manual focus mode. On most DSLR cameras this is a switch on the lens barrel, but on mirrorless cameras it’s often found on the camera body instead.
6. Choose The Correct White Balance Mode
White balance is how warm or cool the colors in the scene are perceived by your camera.
It’s important that you don’t let the camera decide how warm or cool the colors are because it will most likely choose a different value for each of the photos you take. This will result in each photo looking slightly different, and the photo merging software will struggle to merge the photos together correctly for the final panoramic photo.
Your camera has a range of white balance presets. Consult your camera’s user guide to find out how to change the white balance on your camera.
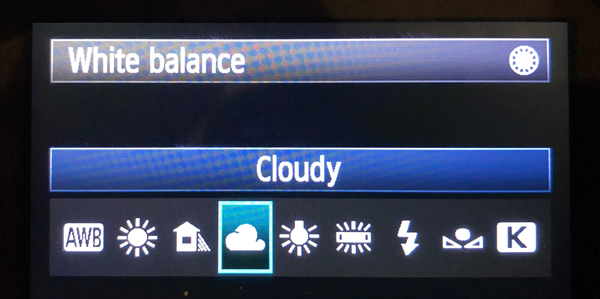
As you’ll most likely be photographing an outdoor scene, choose the Sunny or Cloudy preset depending on the lighting conditions.
7. Shoot Panoramic Photos With Your Camera Positioned Vertically
For horizontal panoramic photos, shoot with the camera positioned vertically as this will give you more wriggle-room for the photo merging software to work its magic.
It does mean that you’ll need to take more photos than with the camera positioned horizontally, but it’s totally worth the extra effort.
It doesn’t matter whether you shoot your photos from left to right, or right to left, but make sure the camera is kept level and steady.
It’s perfectly ok to create a vertical panoramic photo. A tall tower, waterfall or mountain can be captured effectively by moving the camera vertically in between each shot. In this situation, have the camera positioned horizontally, as this will give you better results later.
8. Take Multiple Photos & Overlap Your Shots By At Least 30%
The photo merging software requires you to have a generous overlap of each photo you take. It needs this to make it possible to match up and align the photos. When you shoot panoramic photos, aim for an overlap of about one-third or about 30%.
Merge Your Photos Together
Now you need to merge the photos you’ve taken together. While it’s possible to do this manually, it’s very tricky, so we’ll use some software to make the task really simple.
There are many different software packages which will merge your photos together to create a panoramic photo, including dedicated photo merging packages and general purpose photo editing packages with photo merging capability. But for this tutorial, we’ll use Adobe Lightroom Classic CC which is available as part of the Creative Cloud Photography plan, starting at US$9.99/month.
If you’d prefer a one-off payment, Adobe’s Lightroom 6 is a standalone version, available from Adobe for a one-time price of $149.
Before we proceed, it’s important that you don’t make any edits to the individual photos that make up the panoramic photo before they are merged. This can lead to visual inconsistencies in color and exposure. So, always wait until you’ve finished merging the photos together, and make your edits to the finished panoramic photo later.
Also, Lightroom Classic CC insists that your photos are all exactly the same width and height (in pixels), so avoid cropping your images before merging.
1. Import Your Photos Into Lightroom Classic CC
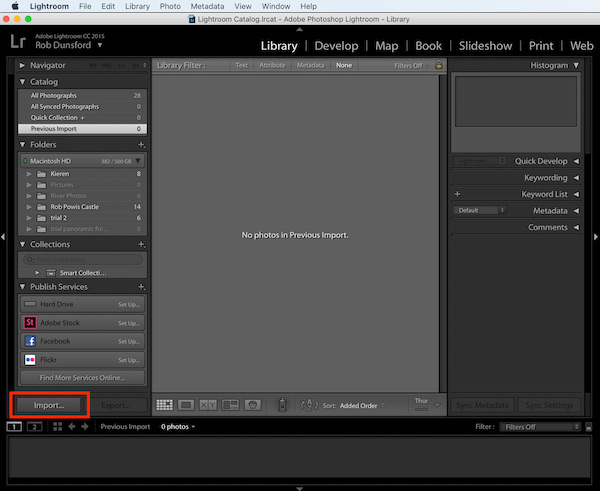
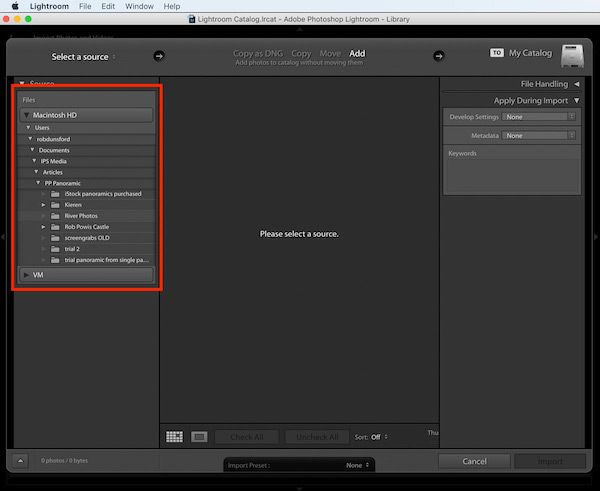
Open the Lightroom Classic CC program and click the “Import” button.
Navigate to the folder which contains the photos you wish to create your panoramic image from.
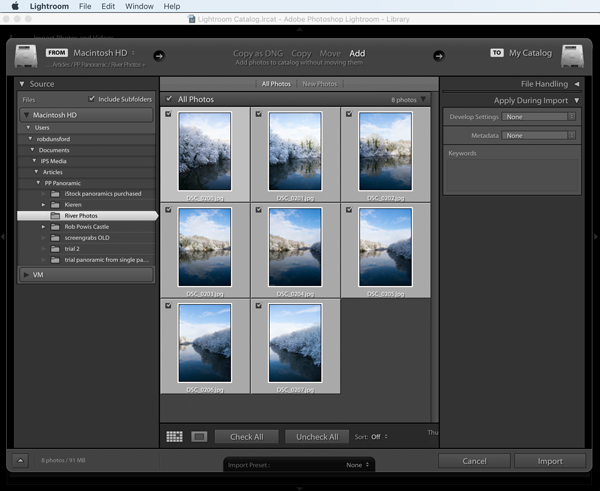
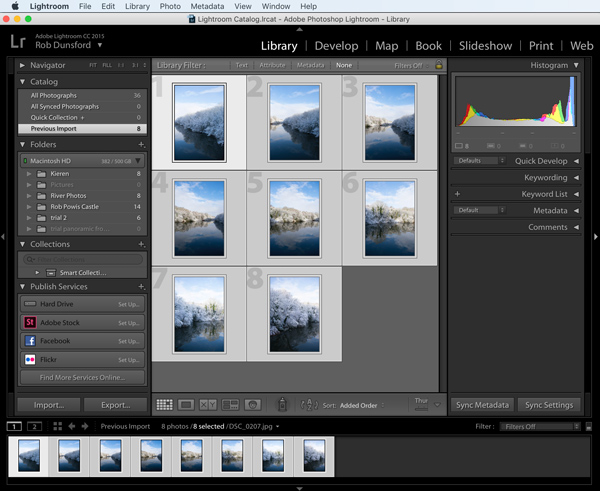
Once you’ve clicked on the folder where your photos are stored, the photos will be displayed as thumbnail previews.
Select the images you wish to use in this folder by holding down the Command key (on a Mac), or the CTRL key (on a PC). Then click each of the images you want to use. Finally, release the Command key or the CTRL key.
Alternatively, if you want to use all the photos in the folder, press Command + “A” (on a Mac), or CTRL + “A” (on a PC).
Once selected, the border surrounding each of the selected photos turns a lighter color gray.
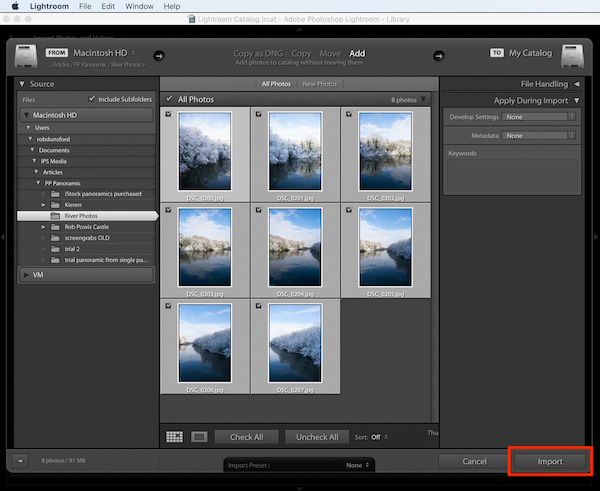
Next, press the “Import” button to the right of the screen.
2. Merge The Imported Photos
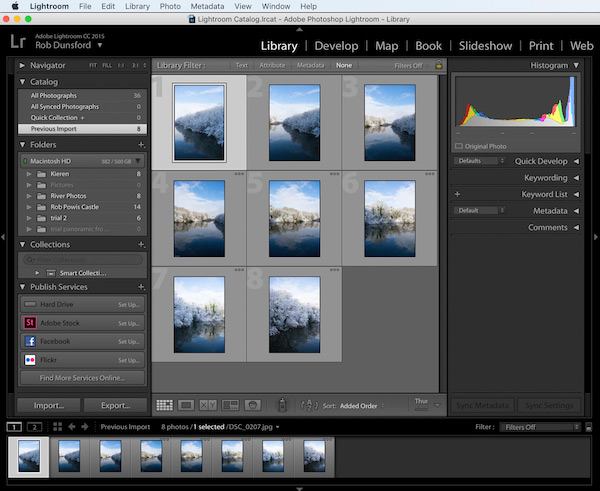
Once the photos have imported, you’ll see them all displayed on the screen again.
Select them all by pressing Command+”A” (on a Mac), or CTRL+”A” (on a PC). The border surrounding the selected photos will turn a lighter color gray.
You’ll notice all the photos are numbered but don’t worry if they’re not in the order you want. The merging process is smart enough to figure this out.
Next, via the main menu, go to Photo > Photo Merge > Panorama.
3. Choose The Output Settings
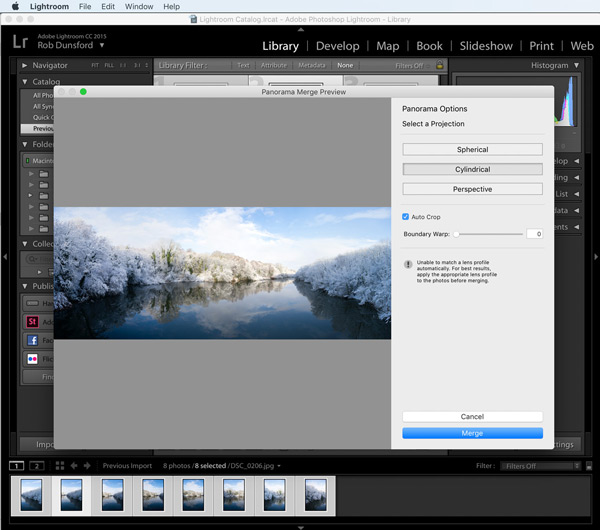
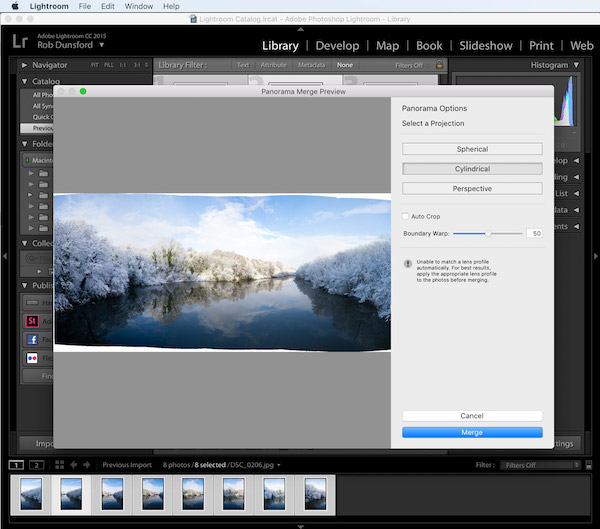
Next, you’ll see a preview of your merged photos.
3.1 Projections
Lightroom Classic CC has three possible projection modes and chooses the most suitable projection based on the images you’ve merged. Therefore, leave the projection setting unchanged.
3.2 Boundary
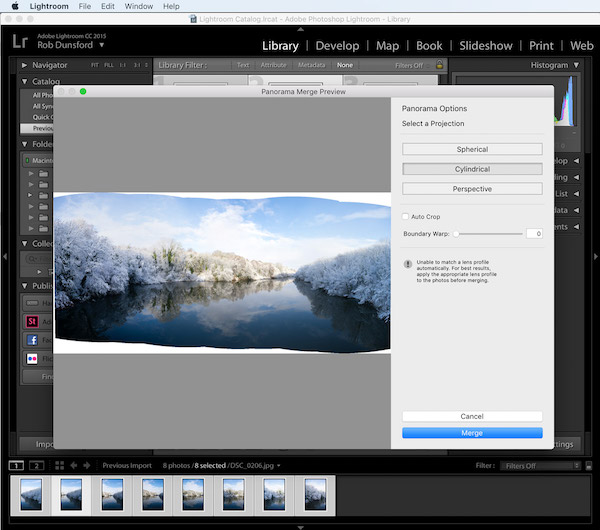
By default, the resulting panoramic image is auto-cropped, but for illustration purposes, untick the “Auto Crop” option. You can now see the irregular white boundary created by the merging process. This is the result of the software adjusting the perspective of each of the original photos.
There are two ways to remove this white boundary.
The first is to tick the Auto Crop option again, which reduces the image size to crop out the white boundary.
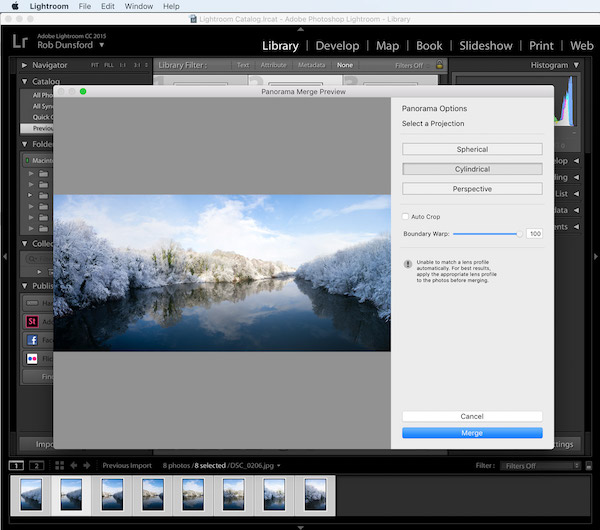
The second is to adjust the Boundary Warp slider to warp the image to fill the white boundary. Here I’ve adjusted the boundary warp effect to 100%.
Lightroom Classic CC cleverly distorts the image to fill the white space up. Be aware that this may cause visible distortion in your final panoramic image. If that happens, try using a smaller boundary warp value as this results in less white boundary than before. Then use the auto-crop feature to remove the rest of the white space.
In the example below I’ve selected 50% boundary warp to reduce the amount of distortion.
3.3 Merge
Finally, click the Merge button.
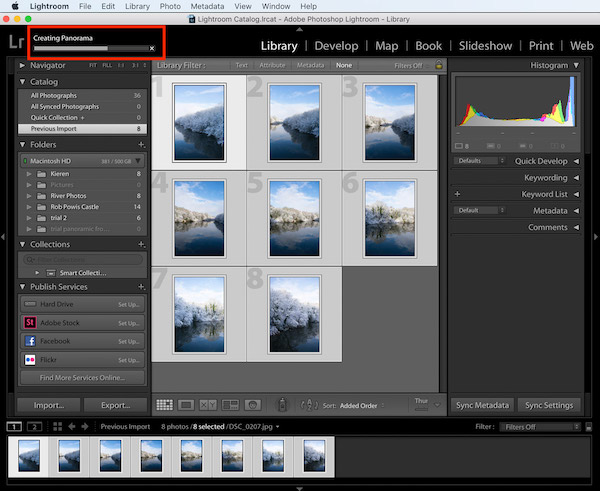
How long the merge takes depends on the number of photos you’re merging. Several photos will merge in under one minute, but dozens of photos could take several minutes to merge. You’ll see a progress bar at the top left corner of the screen, as shown below.
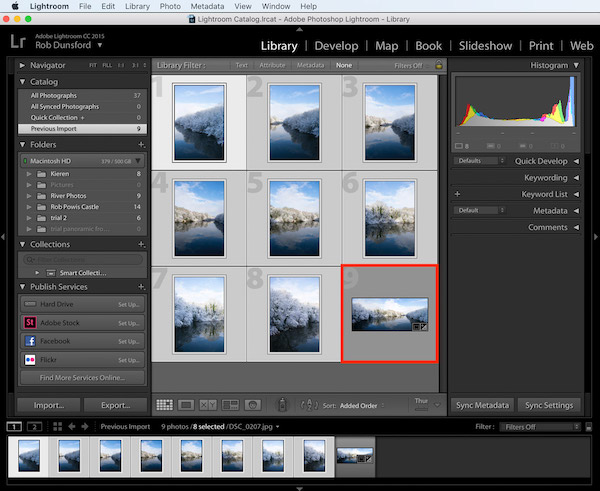
Once completed, your panoramic photo will appear next to the photos you imported earlier.
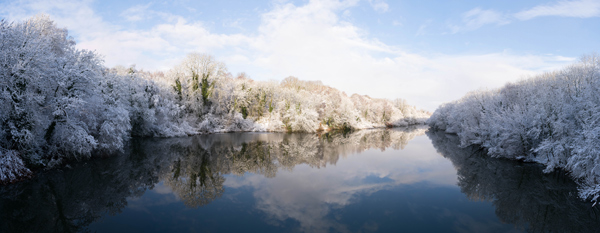
And here’s the result – a stunning panoramic image created from the original photos. Sadly, the screen size doesn’t do justice to the actual size and quality of the resulting image, which is over 13,000 pixels wide and 5,000 pixels high.
This panoramic photo could easily be printed up to several feet wide if it was going to be viewed from a reasonable distance. If the photo was going to be viewed from close quarters, it could be printed up to three or four feet wide. This is far larger than you’d normally be able to print a single shot taken with your camera.
Shoot Panoramic Photos: Summary
In this article, you’ve discovered how to shoot panoramic photos by capturing the individual photos correctly, and using Lightroom Classic CC to merge them together into the final panorama.
Capturing landscapes in such great detail is very satisfying. And the massive resolution of the resulting image files means you can easily print your work at very large sizes for hanging on a wall.
Lastly, don’t wait until you find the perfect scene. You can shoot panoramic photos anywhere while you practice the techniques covered in this article!

