Landscape photography goes all the way back to the invention of photography. If you’ve struggled with creating great landscapes, or haven’t tried landscape photography yet, this tutorial will provide you with six tips for mastering the technical and artistic aspects of landscape photography.
The definition of landscape photography is quite broad, however, the majority of landscape photographs involve a lot of natural scenery, are usually horizontal instead of vertical, and make use of a wide-angle lens for a broad, wide view.
1. Choose The Best Time Of The Day For Landscape Photography
Landscape photography is both rewarding and challenging. Often the success of your landscape photography is dependent on good or dramatic weather. In this section you will learn what time of day is best for landscape photography, and how to maximize that time for the best results.
1.1 Photograph Before Sunrise
While it may not be enjoyable to wake up and leave your house when it’s still dark, creating landscape photos before the sun rises will give you the best chance for success. The reason that professional landscape photographers choose to shoot before the sun rises is because the land gets bathed in a soft and beautiful light.
1.2 Photograph After Sunrise
Don’t go home when the sun has risen! Keep photographing landscapes for another hour or so. Sometimes called the Golden Hour, or Magic Hour, this is when the sunlight is the warmest and softest. Sunlit areas will have a happy feel, while shadows usually have a cool, bluish color.
1.3 Photograph Using Midday Harsh Light
While it’s true that a lot of landscape photographers go home after they create their early morning photographs, you can still keep shooting. Take a look at the landscape photo below. It’s a nice shot, but a little boring because of the harsh noon-time sunlight directly above.
To give your noon-time landscape photo a bit more punch, add a human-made subject that will distract your viewer from the harsh light. You may have to wait a while for something to enter your picture, but like this sailboat, it will be worth the wait!
1.4 Photograph Before Sunset
Go to your preferred landscape location an hour prior to sunset, and use that hour to photograph the beautiful sunlit scenery that surrounds you. Most landscape photography consists of natural scenes only, however, if you see a beautiful scene with houses or farmland, feel free to add them into your photo.
1.5 Photograph After Sunset
After the sun sets, the sky and landscape appear to have a soft blue color which works perfectly for landscape photography. Because the light in the sky is not very bright after sunset, make sure you use a tripod to get sharp photos.
2. Lens Choices For Landscapes
The lens that came with your camera, often called the kit lens, is perfectly fine for landscape photography. All you need to do is set your lens to its widest zoom length (properly known as the lens focal length). For example, if your DSLR or mirrorless-style camera has a lens zoom range of 18mm-55mm, zoom to the lowest millimeter (mm) number on the lens, which in this case is the 18mm mark.
To illustrate what 18mm on your zoom lens could look like, take a look at this photo:
Next, take a look at the photo below, which is ‘zoomed-in’ to a zoom range much closer to 55mm:
If you feel the kit lens that came with your camera isn’t wide enough for your landscape photography needs, there’s a class of lenses made especially for landscape photographers called ultra-wide angle lenses. Before you ever purchase an additional lens, however, confirm with the lens seller that it will fit your specific camera body (the make and model of your camera).
For Canon users, this is the Canon ultra-wide lens which has a wide-angle zoom range of 10mm-18mm:
Canon users can also choose from great third-party lens manufacturers such as Sigma. This is Sigma’s 10mm-20mm ultra-wide lens:
As well as Canon users, Nikon owners can choose between Nikon lenses, Sigma, Tokina, Tamron, plus other third-party lens companies. The Tamron 10mm-24mm lens is a great choice for landscape photography.
The Tokina 11mm-16mm lens for Nikon cameras is another excellent choice for creating beautiful, wide landscape photos.
Mirrorless cameras have been gaining in popularity in the past few years, and if you are an owner of a Fujifilm X Series camera, this Fujifilm 10mm-24mm lens is used by both professionals and amateurs.
If you own an Olympus Micro Four-Thirds camera such as the OM-D series, this Olympus 9mm-18mm lens will work well for landscapes.
This mirrorless Panasonic Lumix 7mm-14mm lens will provide the width that you need for expansive landscapes.
3. Why Tripods Are Essential For Landscape Photography
Tripods are great for creating unique early morning or evening landscapes photos. When it’s too dark outside to hand-hold your camera, a tripod is essential. Take for example this photo of the ocean about an hour after sunset. The water looks calm, but it was actually full of waves.
When you photograph landscapes that include water when it’s dark outside, and you also use a tripod, the water will appear to be smooth like ice. When it comes to choosing a tripod, MeFoto is a reputable company with many lightweight tripod options.
4. Composing Options For Landscapes
Composition is central to creating great landscape photographs. Below are seven composition tips that will help you create amazing landscape photos.
4.1 Use Angles In Your Landscape Photos
Do you see a triangle shape within the photograph below? The beach sand makes a triangle, and the water also is triangular in shape. To create landscape photos with a strong emotional impact, try to include triangles, circles, curves, and arches in your photos. Each geometric shape has a unique feel to it.
4.2 Use Verticals Only When You Have A Strong Vertical Scene
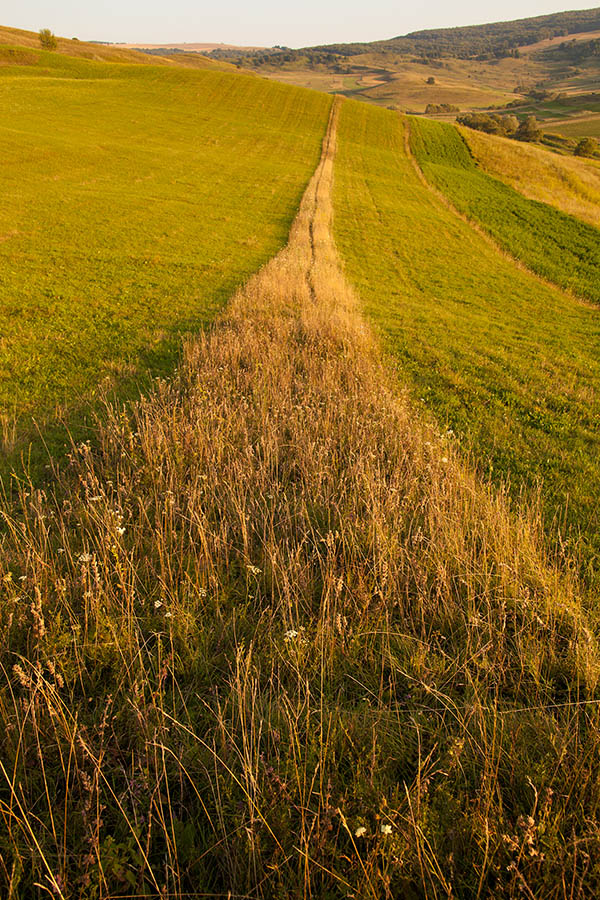
People are used to landscape photography being in landscape orientation (the photo is wider than it is high). The exception to this is when your scene has a strong vertical aspect that visually leads your viewer up a pathway. This photo works better as a vertical because of the way that the grass was cut by the farmer.
4.3 Use Back-Lighting For Extra Landscape Drama
Back-lighting simply means that the subject in your landscape is being illuminated by the sun, from behind the subject. In the case of the following photo, the tree is the subject. This technique works best when your landscape scene has a large tree, as the tree will cast a dramatic shadow.
4.4 Add A Small Recognizable Object For Scale
While landscape photographs often only show natural scenes, it’s fine to add human-made objects to provide a sense of scale. In the photo below, the farmhouse provides the viewer with a sense of scale, which helps the viewer understand just how wide the landscape is.
4.5 Zoom In Close To Create An Abstract Landscape
Landscape photos are usually created with wide-angle lenses. If you see really interesting light in the distance, however, feel free to “zoom your lens in” similar to the photo below. The term “zoom in” means that you are changing your lens from a wide-angle view to what’s called a telephoto, or zoomed-in view. For example, on an 18mm-55mm kit lens, 18mm is called a wide-angle, and 55mm is often called zoomed in.
4.6 Add People To Your Landscapes
While it’s rare to include people in a landscape, sometimes it’ll help make a mediocre photo more interesting. While the photo below was a decent landscape, it lacked a sense of drama. By waiting for a person to walk along the beach, the scene became more interesting.
4.7 Compose Your Landscape With The Rule Of Thirds
This early morning landscape photo turned out nicely, however it could be even better if photographed using the rule of thirds. Do you see how there is too much white sky in this photo?
The extra white sky really doesn’t add any value to the photo. Instead, it could’ve been composed much better by using the rule of thirds. In the following corrected version, the top 1/3 is white sky, the middle 1/3 is cloud and distant land, and the lower 1/3 is the foreground landscape.
Below is the final image that uses the rule of thirds:
5. Use “Landscape Mode” For Best Results
Most cameras have a similar rotating dial as the image below. If your camera doesn’t have a physical dial that looks like this, it will at least have one within your camera’s menu. For landscape photography, it’s best to switch to what’s called ‘Landscape Mode’.
You can access this mode by switching the dial to the little icon that looks like a mountain. Landscape mode helps your photography by keeping everything in your wide-angle photo sharp and in focus.
6. Optional Camera Accessories For Landscape Photography
While there are potentially hundreds of optional gadgets on the market aimed at landscape photographers, there are two that stand out as being very useful. In this section, you will learn about lens filters for landscapes as well as remote shutter release options.
6.1 Use UV Filters For Landscape Photos
‘UV’ is short for ‘ultra-violet,’ and a UV filter has physical properties that block out unwanted bluish haze from your landscape photos. The UV filter also works as a lens protector, so many photographers keep this filter attached to their lens at all times.
When shopping for a UV filter, make sure you get the correct size, which is always in millimeters. For example, on the front of your lens, you will see millimeter lens diameter markings such as 52mm, 58mm, 72mm, etc. The Tiffen UV filter above is for lenses with a common 52mm diameter.
6.2 Use Polarizing Filters for Landscapes That Include Water
Polarizing filters are very good for any landscape photo that includes water, such as lakes, rivers, and oceans. By rotating the filter after you attached it to your camera lens, the filter will remove water reflections and make the sky a rich, dark blue color. This Tiffen circular polarizer filter is a popular choice.
Make sure you choose the right filter diameter that works with your own particular lens. Some common filter diameters are 52mm, 58mm, 62mm, 72mm, and 77mm.
6.3 Use A Remote Shutter Release To Avoid Camera Shake
When photographing landscapes, it’s critical to keep your camera very still. Tripods are a great help as they can reduce the chance of getting a shaky or blurry landscape photo. An additional option to almost guarantee a sharp landscape photo is to buy a remote shutter release.
The Canon RS60 remote shutter release attaches to your Canon DSLR via a cable. You can take your landscape photo by clicking the remote shutter release button instead of touching your camera. This helps to reduce camera shake during picture-taking, as your hand doesn’t touch the camera body.
Another remote shutter release option is a radio-controlled version that doesn’t have any cables. With radio-controlled remote shutter releases, you can still take a picture even if you are up to 16 feet away from your camera. This third-party remote shutter release by Neewer is made for Nikon DSLR cameras:
One of the wonderful aspects of landscape photography is how its definition is very broad. You are free to use as much creative license as you like to create your landscape images!
To summarize this tutorial, choose the best time of the day for your style of landscape photography. Use the widest angle zoom focal length on your lens, and use a tripod when the sky isn’t bright. Remember the composition rules, and use Landscape Mode. Don’t forget about filters and remote shutter releases for even better landscape results. Have fun with your next landscape photography session!


