Do you struggle to capture beautiful, blurry backgrounds in your photos? If so, you need to know how to create bokeh with your camera. Bokeh refers to the out-of-focus areas of your image. In this article, you’ll discover what bokeh is, what causes it, and how to create a stunning bokeh background in your photos.
What Is Bokeh?
The word “bokeh” originates from the Japanese word “boke” which means “blur”. In photography terms, it refers to the out-of-focus regions of a photo. However, bokeh isn’t the blur itself; it’s the quality of the blur, and in particular, how out-of-focus points of light, or highlights, are rendered in the photo.
A bokeh background can come in many different forms. It can be a smooth and almost featureless blur, as shown in the photo below, where it provides a subtle background to the subject.
Sometimes bokeh can look a little too busy, as shown below. It’s not as smooth or “creamy” as the bokeh in the previous photo. This makes it more distracting as it competes with the subject for the viewer’s attention. This kind of bokeh is generally considered to be less desirable.
A bokeh background can appear as geometric shapes, like circles, as the photo below illustrates.
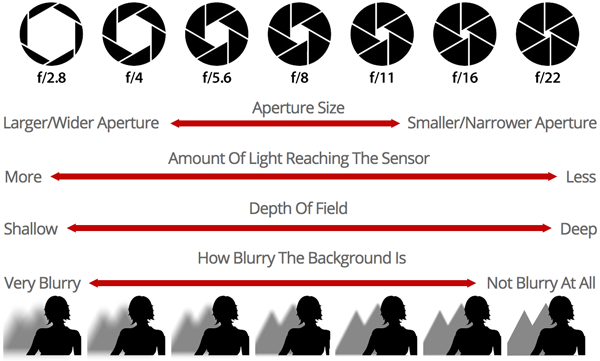
The shape of the bokeh is caused by the number of blades on the lens diaphragm and their shape. The more blades the lens diaphragm has, the more circular the bokeh will appear. Straight-edged blades give a more angular bokeh, and curved blades give a more circular bokeh.
In the example above, the out-of-focus highlights in the bokeh aren’t circular but have eight sides. This is because the lens diaphragm only had 8 blades.
Highlights in bokeh can also look oval in shape, as shown in the photo below. This happens when the source of the highlight is not close to the center of the scene.
Having good quality bokeh is especially important for types of photography that rely on a shallow depth of field – such as macro and portrait photography. The soft, golden bokeh in the portrait photo below really helps the subject to stand out.
How To Create A Bokeh Background In Your Photos
In photography, achieving great bokeh shouldn’t be your primary goal. Your main priority is to capture your chosen subject as well as you can. However, bokeh can complement your subject, and the steps below will help you do that.
1. Choose The Right Lens
Bokeh is not caused by camera, but the lens. Due to their design, different lenses produce different types of bokeh. Therefore, you’ll find some of your lenses create better bokeh than others.
Generally speaking, you’ll get the best bokeh with prime lenses (those with a fixed focal length) with large maximum aperture sizes – e.g. f/1.2, f/1.4, f/1.8, f/2.0, f/2.8.
2. Zoom In
Bokeh can be achieved at any focal length, but if you’re struggling to get a strong bokeh effect, try zooming in more, or using a lens with a longer focal length.
If zooming in means you can’t fit your subject in the frame, move further away from your subject and re-shoot.
3. Choose A Wide Aperture
Since your main priority is your chosen subject, choose the widest aperture which provides enough depth of field to keep your subject in sharp focus.
Remember that, confusingly, a wide or larger aperture has a small f/stop number, e.g. f/1.2, f/1.4, f/1.8, f/2.0, f/2.8, whereas a small aperture has a large f/stop number, e.g. f/8, f/11, f/16 or f/22.
4. Get Close To Your Subject
Another tip for increasing the strength of your bokeh is to get much closer to your subject. This won’t work for all subjects, but it’ll give you a shallower depth of field and increase the intensity of the background bokeh.
5. Deliberately Include Highlights In Your Scene
The most dramatic bokeh comes when there are highlights in the scene. Highlights are the brightest areas of the scene, and when they are very out of focus, they can create beautiful bokeh.
One way to introduce highlights is to include one or more light sources in your scene. One of the best, most visually appealing, light sources are a string of fairy lights.
So, dig them out from the attic, drape them on a wall, table or banister, plug them in and switch them on. Position your subject in the foreground, with as much space as possible between the subject and the lights in the background, and shoot.
The further away the source of your highlights is from your subject, the more dramatic the bokeh will be.
6. Create A Custom Bokeh
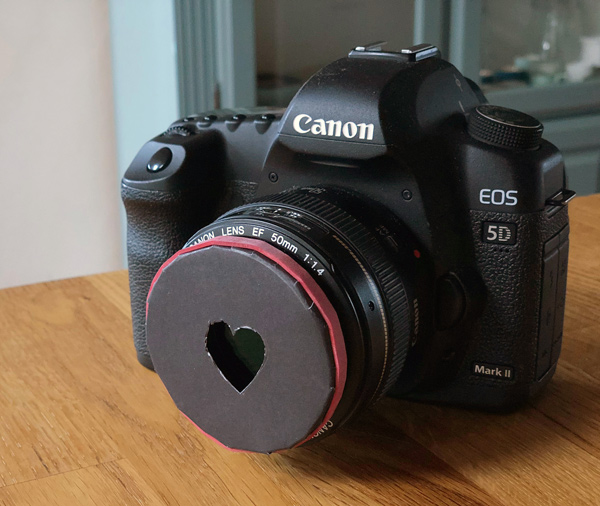
Remember we said earlier that the lens aperture determines the shape of the bokeh? Well, you can effectively create your own aperture, in any shape you like!
The heart-shaped bokeh in the photo above was created by cutting a heart shape out of a sheet of dark colored paper. Then I attached it to the front of my camera’s lens, as shown below.
Lastly, I photographed a string of fairy lights with my camera’s lens in manual focus (MF) mode, deliberately making sure the lights were out of focus before I pressed the shutter button to take the photo.
7. Make Bokeh The Subject Of Your Photo
So far, we’ve talked about how bokeh should support and complement your subject, not distract from it. But it’s perfectly ok to make bokeh the subject of your photo.
To do this, you’ll want to remove any other subjects from the scene, and focus your camera manually.
Alternatively, if you’re not comfortable with manual focus yet, follow these steps:
- Point your camera at the closest object the camera can auto-focus on.
- Half-press the shutter button.
- Re-compose the shot so that only bokeh is visible in your viewfinder.
- Press the shutter button fully.
Bokeh Background: Summary
Bokeh is the quality of the out-of-focus areas of your scene. While they’re not usually as important as the subject, you should pay close attention to the quality of your out-of-focus areas, because these have the power to complement or ruin the photo as a whole.
To recap, in order to get a great bokeh background, use your best lens, zoom in, use a wide aperture, get close to your subject and make sure you include some out-of-focus highlights created by a distant light source.


