For most of us, the fun part of photography is actually getting out there and taking photos. While it’s true that editing photos can be very rewarding too, when it comes to editing dozens, hundreds, or even thousands of photos, it gets tedious and time-consuming very quickly. In this article, you’ll discover how to batch edit photos in Lightroom CC, consequently taking all the pain out of editing multiple photos using Lightroom’s powerful batch edit feature.
1. What Is Batch Editing?
Batch editing is a powerful feature of Lightroom CC which allows you to apply edits to multiple photos.
Think back to the last time you photographed a social event, or you went away on holiday with your camera. Perhaps you returned home with hundreds or even thousands of photos?
Maybe you noticed that most, or all, of your photos looked a little under-exposed, or the colors were a little muted, or the images were a little soft. Sure, you could work your way through each photo fixing them manually, but it could take many hours, or even days.
When you batch edit photos in Lightroom you can achieve the same results in a matter of minutes, leaving you time to do something more interesting!
2. Import Photos Into Lightroom CC
Before you batch edit photos in Lightroom CC, you’ll need to import the photos you want to edit. However, if you’ve already imported the photos, you can skip this section.
2.1 Initiate The Import
There are three main ways to import photos into Lightroom CC:
- Click the Import button in the lower-left corner of the Library module.
- From the main menu, choose File > Import Photos And Video.
- Drag a folder or files from the Explorer (PC) or Finder (Mac OS) into the Grid view, and then skip to step 2.2.
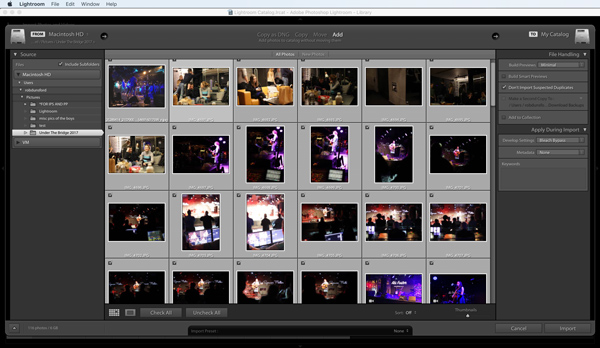
In the upper-left corner of the import window, click Select A Source, or use the Source panel on the left side of the import window to navigate to the files you want to import.
2.2 Specify How You Want To Add The Photos To The Catalog
In the top center of the import window, specify how you want to add the photos to the catalog:
Copy As DNG: Copies photos to the folder you choose and converts any camera raw files to the Digital Negative (DNG) format.
Copy: Copies the photo files to the folder you choose, including any sidecar files.
Move: Moves the photo files to the folder you choose, including any sidecar files. Files are removed from their current location.
Add: Keeps the photo files in their current location.
2.3 Select The Photos You Want To Import From The Preview Area
Select the photos that you want to import from the preview area in the center of the import window. A check mark in the upper-left corner of the thumbnail indicates that the photo is selected for import.
To filter photos in the preview, select any of the following:
All Photos: This option removes all filters.
New Photos: This option excludes suspected duplicates and previously imported photos.
Destination Folders: This option groups photos by their destination folder. (Available only when copying or moving photos into a catalog).
Click the Loupe view button in the toolbar to zoom in on a single photo.
To globally select or deselect all photos in the folder, click Check All or Uncheck All in the toolbar.
Click the Sort pop-up menu in the toolbar to sort photos by capture time, checked state, filename, or media type.
Drag the Thumbnails slider to adjust the size of the thumbnails in the grid.
Click the box in the upper-left corner of a preview to select or deselect specific photos. Alternatively, Alt-click (PC) or Option-click (Mac OS) anywhere on the thumbnail to select and deselect photos.
2.4 Specify The Destination For Your Imported Photos
If you’re importing photos by moving or copying them, specify where to put them.
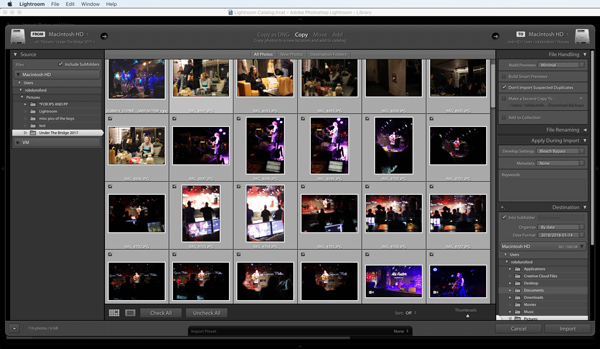
In the upper-right corner of the window, click To and choose a location for the photos. Or click a location in the Destination panel and specify other options as described below.
Into Subfolder: This option copies or moves the imported photos into a new folder. Type the name of the new folder in the text field.
Organize: This option lets you organize the photos in the new subfolder in one of three ways:
- preserve the original folder hierarchy of the source folder.
- create subfolders by date.
- or put all photos into one folder.
Date Format: This option lets you choose a format for the dates.
2.5 Specify Other Import Options
Specify other options for the imported files using the panels on the right side of the window. Most of these are beyond the scope of this article, but they include options for backing up photos during import, ignoring duplicates, and renaming files.
The one option of importance to batch editing is Apply During Import. In the Apply During Import panel on the right side of the import window, choose a setting from the Develop Settings menu. Here you’ll find a wide range of standard edits that can be applied to all your photos as they’re being imported.
3. Use A Preset To Adjust Multiple Photos
The easiest way to batch edit photos in Lightroom is to use one of the existing presets offered by Lightroom CC.
Just in case you skipped the import section above, it’s worth noting that you can apply a preset batch edit to all your photos at the import stage. Jump back to section 2.5 above to discover how to do this.
3.1 Select A Preset
If you’ve already imported your photos, no problem, you can still apply presets to all your photos.
Firstly, go to the Library tab.
While you can simply apply a preset to all the selected photos, it’s better to double-click on one of the photos so you can check the preset edits in more detail before you apply them to all of the photos.
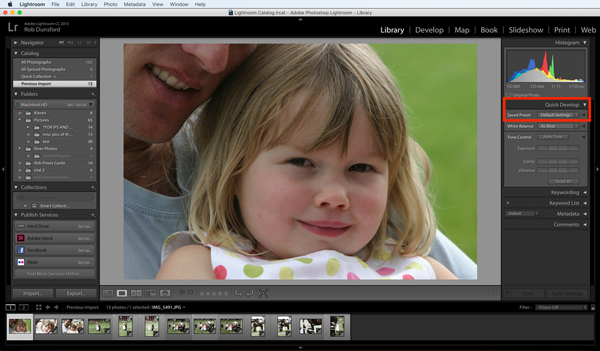
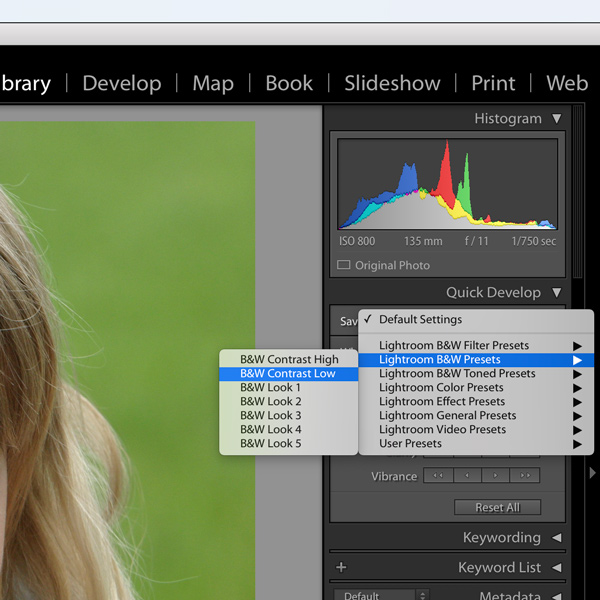
With the selected photo displayed large on your screen, look to the top right of your screen and find the Quick Develop panel.
Click into the drop-down select box next to Saved Preset, and choose the preset you want to try out. As soon as you click on a preset, the large image is updated to have the preset applied. Choosing a different preset overrides the previously selected preset.
3.2 Select Which Photos Will Receive The Preset’s Edit
Once you’re happy with the results, press COMMAND + A (on a Mac) or CTRL + A (on a PC) to select all of the imported photos, or hold down the COMMAND key (on a Mac) or the CTRL key (on a PC) whilst you click on the imported photos you want to receive the preset edits.
3.3 Apply The Preset To The Selected Photos
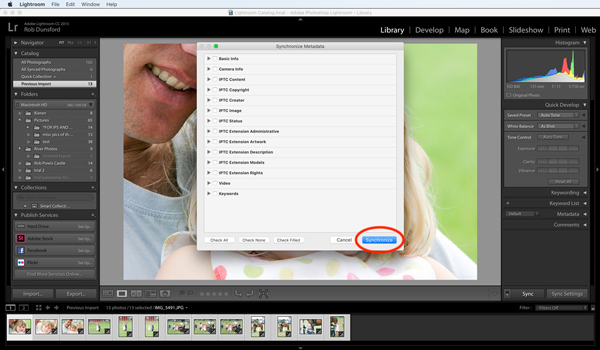
To apply the chosen preset to the selected photos, click the Sync button.
Next, you’ll see a pop-up dialog box where you can specify any of the metadata to be stored alongside your images. It’s not important right now, but if you like your metadata relevant and up-to-date, then you may want to return to this in the future.
Finally, click the blue Synchronize button to begin the batch update. Once you’ve done this, you’ll see the selected thumbnails at the bottom of the screen change as each receives the preset edit.
4. Apply Your Own Edits To Multiples Photos
For more control over how you batch edit photos in Lightroom, switch over to the Develop tab.
Again, choose a photo from the imported photos to try your edits out on by double-clicking on one of the thumbnail images, making it appear large on the screen.
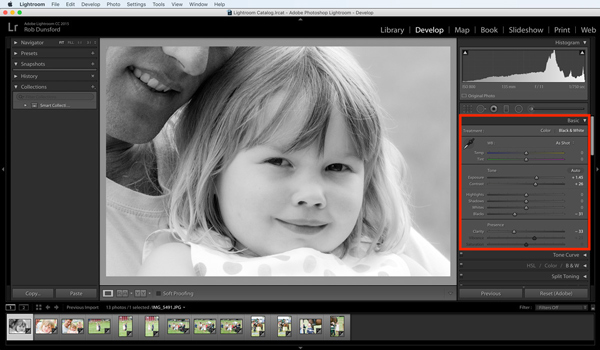
On the right-hand side of the screen, you’ll find a wide range of tools for editing your photos. Exploring all these tools is beyond the scope of this article, but let’s make some edits that we can apply to the photos we imported earlier.
As you can see below, I’ve used the tools to edit the photo of the girl to be black and white instead of color, and I’ve boosted the contrast and clarity a little.
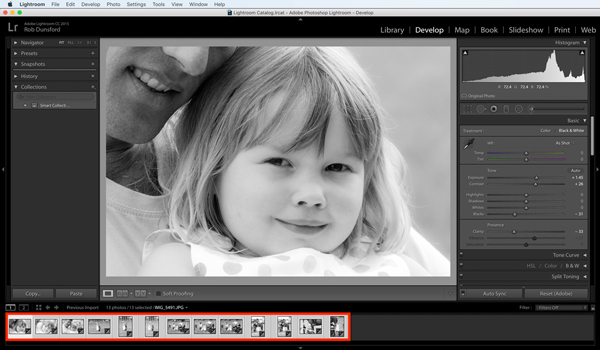
Next, to apply all these edits to all the photos I imported, we need to select them all, by pressing COMMAND + A (on a Mac) or CTRL + A (on a PC).
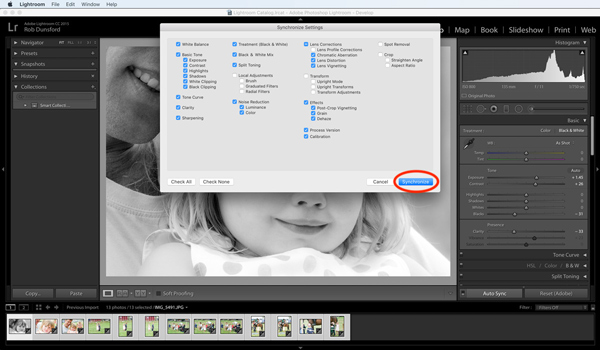
Once that’s done, click the Auto Sync button. A pop-up dialog box titled Synchronize Settings is then displayed.
4.1 Sync All Edits
For now, ignore all the options here, and just click the blue Synchronize button. Next, you’ll see the selected thumbnails at the bottom of the screen change as each receives the preset edit.
4.2 Sync Selective Edits
Alternatively, instead of ignoring the Synchronize Settings options, you can decide which of the edits you made should and should not be applied to all the images.
You might be wondering why this would ever be necessary when you batch edit photos in Lightroom, but it’s actually a very powerful feature.
Let’s imagine you made several edits to your photo, and some of the edits were specific to that particular photo. Perhaps you brightened a region of the photo that was a little too dark. Unless all the photos are too dark in exactly the same region, you’re going to end up with a brighter region in all the other photos that looks strange.
The trick here is to untick the Local Adjustments option as this will prevent edits made using a brush, graduated filters or radial filters.
You can turn off, or on, any of the other options depending on what types of edits you want to be applied to all the photos you imported earlier.
5. Reset Or Undo Your Batch Edit
Regardless of whether you batch edit photos in Lightroom using the presets or your own custom edits, you can easily reset all of the photos which received your edits.
Firstly, click the Reset button at the bottom right of the screen – this resets the edits made to the photo you tested the edits on.
Finally, click the Sync button again, then click the blue Synchronize button in the pop-up dialog box. You’ll then see the thumbnails gradually change back to their previous, unedited state.
Batch Edit Photos In Lightroom: Summary
In conclusion, in this tutorial, you’ve discovered how to import and batch edit photos in Lightroom CC. You’ve learned how powerful this feature is and how it can be applied selectively so that only certain edits are applied to all the selected photos. You’ve also discovered how to undo or reset the batch edits.
To summarize, this is a wonderful time-saving feature that will free you up to take more photos and do less editing.

